-
Tài liệu hướng dẫn
-
Kênh POS
Hướng dẫn sử dụng phần mềm quản lý bán hàng
-
Dịch vụ ăn uống
Hướng dẫn sử dụng phần mềm quản lý nhà hàng và quán cafe
-
Kênh Facebook và Sàn TMĐT
Hướng dẫn quản lý bán hàng online trên Facebook và sàn TMĐT
-
App Mobile
Hướng dẫn bán hàng nhanh chóng trên ứng dụng điện thoại
-
Kênh Website
Hướng dẫn xây dựng website bán hàng
-
Bán hàng đa kênh
Hướng dẫn kết nối và quản lý bán hàng đa kênh
-
Máy bán hàng
Hướng dẫn sử dụng máy bán hàng
-
Sapo Money
Giải pháp thanh toán không tiền mặt và các dịch vụ tài chính toàn diện
-
Sapo Express
Giải pháp tối ưu vận hành và chi phí chuyển phát
-
Bảo mật thông tin
-
- Video
- FAQs
- Tài liệu nhà phát triển
popup-web
Tạo giao diện trang nâng cấp
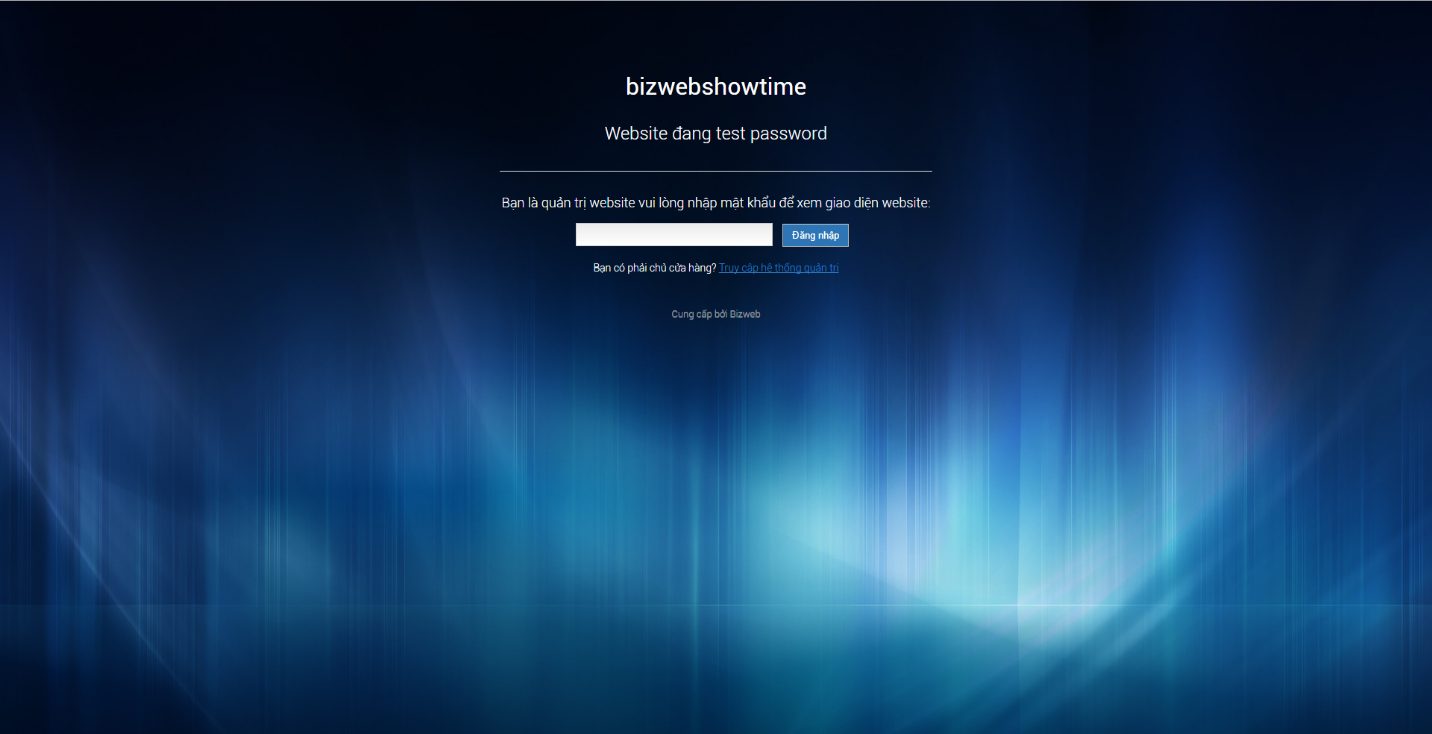
Giao diện website của bạn đang trong quá trình hoàn thiện, bạn không muốn những khách hàng nhìn thấy giao diện chưa hoàn thành. Bizweb cung cấp cho bạn tính năng Bật chế độ hiển thị nâng cấp website dành cho nhân viên quản trị website có mật khẩu mới có thể nhìn thấy trang web của bạn đang trong quá trình hoàn thành đó.
Mặc dù hệ thống cung cấp cho bạn giao diện trang password ở dạng cơ bản, nhưng bạn muốn tùy chỉnh trang password đẹp mắt, thân thiện hơn đối với Khách hàng của mình. Hướng dẫn tạo giao diện trang Password dưới đây sẽ giúp bạn thực hiện được như vậy nhé.
Bước 1: Tạo Template password
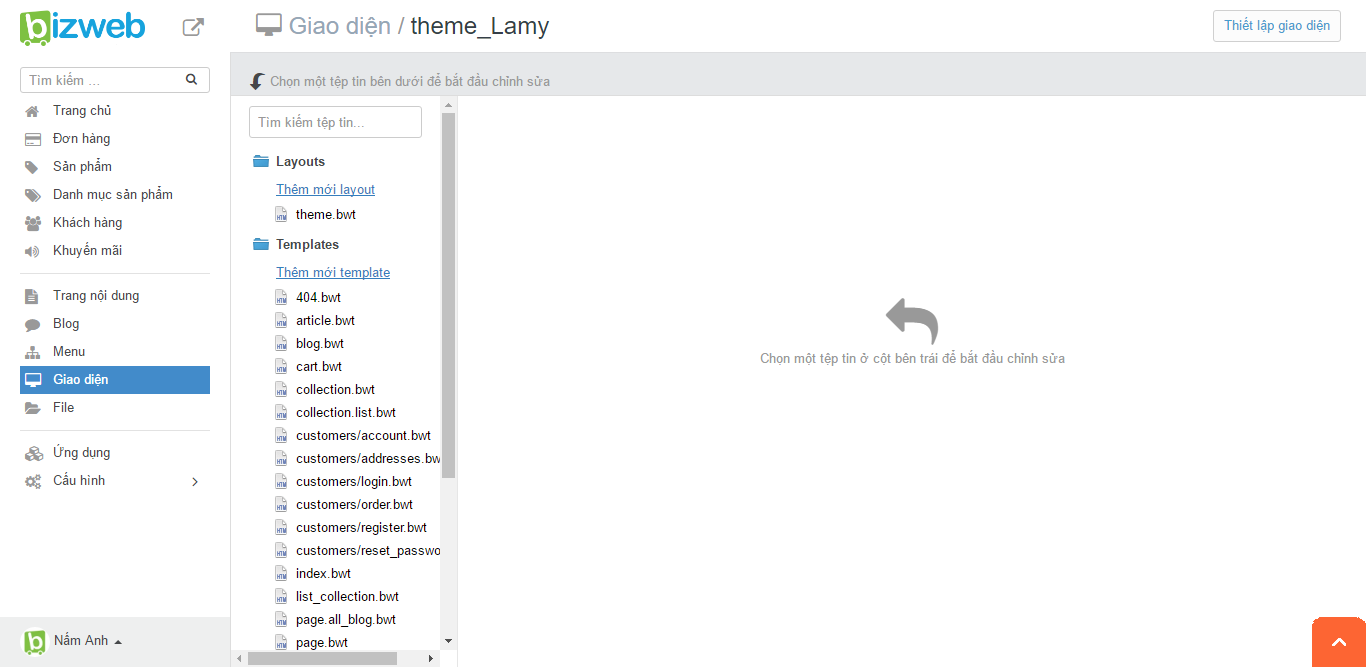
- Tại hệ quản trị website >> Vào Giao diện >> Chọn Chỉnh sửa HTML/CSS của giao diện, tại phần Template click “Thêm mới template”.
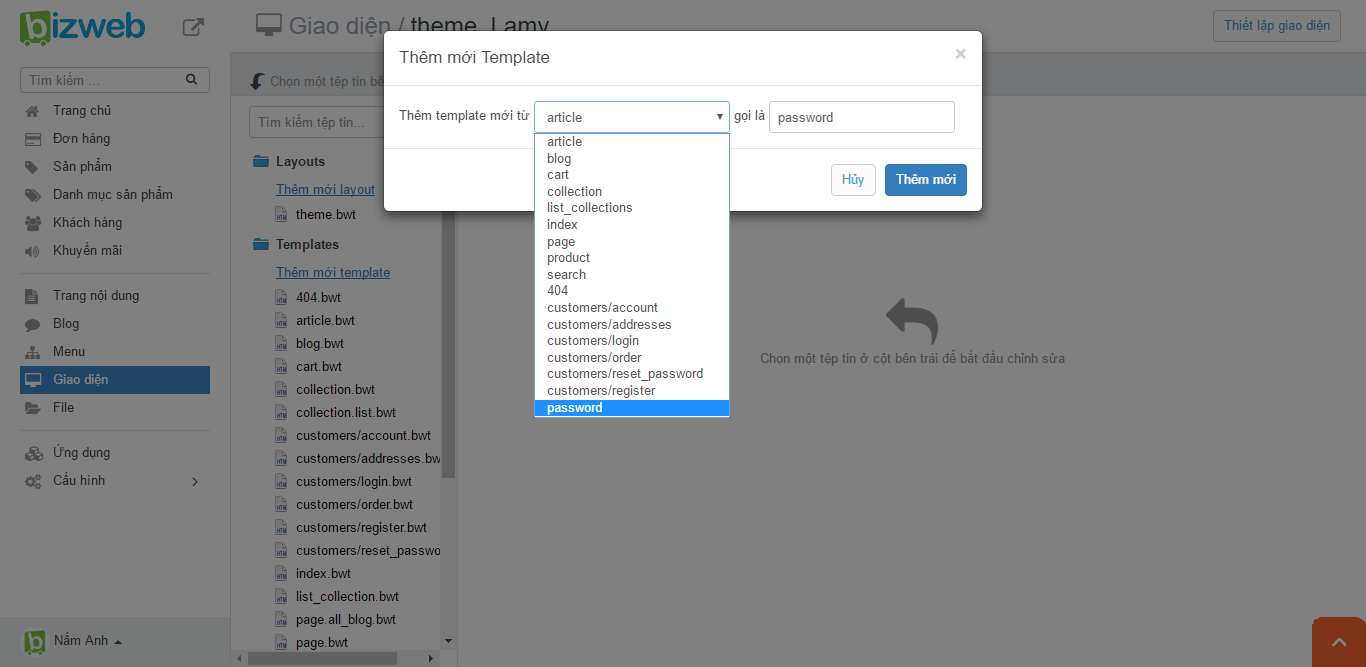
- Popup thêm mới Template hiển thị, bạn chọn các thông tin sau:Thêm template mới từ: Chọn password.
- Gọi là: đặt tên cho trang password theo ý muốn của bạn
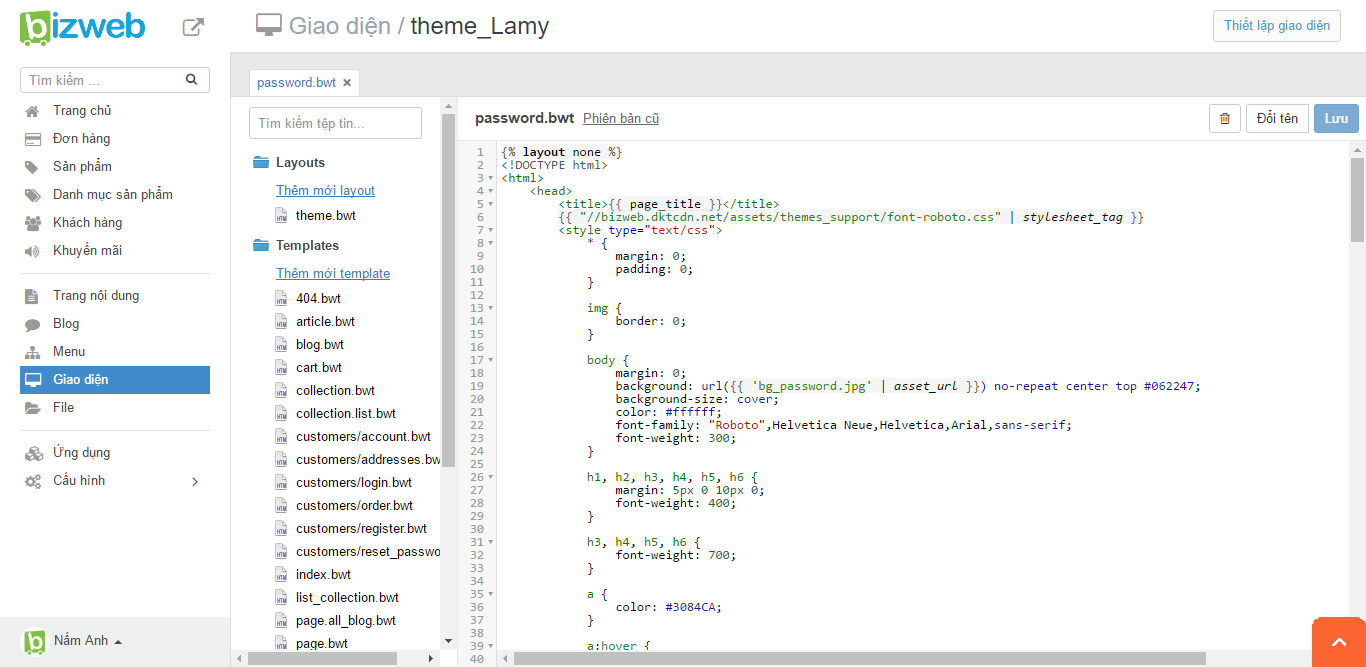
Màn hình chỉnh sửa code của template password hiện ra để bạn có thể tiếp tục chỉnh sửa giao diện hiển thị theo mong muốn của mình:
Bước 2: Chỉnh sửa code trang
a. Chỉnh sửa code:
Theo ví dụ bạn có thể copy đoạn code sau thay thế cho toàn bộ đoạn code hiển thị trên màn hình để có giao diện giống với giao diện mẫu. Hoặc bạn có thể tự tùy chỉnh CSS trong đoạn code có sẵn để hiển thị màn hình password tùy ý.
{% layout none %}
<!DOCTYPE html>
<html>
<head>
<title>{{ page_title }}</title>
{{ "//bizweb.dktcdn.net/assets/themes_support/font-roboto.css" | stylesheet_tag }}
<style type="text/css">
* {
margin: 0;
padding: 0;
}
img {
border: 0;
}
body {
margin: 0;
background: url({{ 'bg_password.jpg' | asset_url }}) no-repeat center top #062247;
background-size: cover;
color: #ffffff;
font-family: "Roboto",Helvetica Neue,Helvetica,Arial,sans-serif;
font-weight: 300;
}
h1, h2, h3, h4, h5, h6 {
margin: 5px 0 10px 0;
font-weight: 400;
}
h3, h4, h5, h6 {
font-weight: 700;
}
a {
color: #3084CA;
}
a:hover {
color: #25669C;
}
p {
margin-bottom: 13px;
font-size: 14px;
}
ul, ol {
margin-bottom: 13px;
margin-left: 15px;
}
ol {
margin-left: 25px;
}
input.btn {
cursor: pointer;
border: 1px solid #bbb;
border-top: 1px solid #ccc;
border-bottom: 1px solid #aaa;
padding: 7px 12px;
color: #ffffff;
background-color: #2E75B6;
}
input.btn:hover {
-webkit-box-shadow: 0px 0px 3px #3084CA;
-moz-box-shadow: 0px 0px 3px #3084CA;
}
input.btn:active, input.btn:focus {
outline: none;
-moz-outline-style: none;
background: #eee;
border-top: 1px solid #aaa;
border-bottom: 1px solid #ccc;
color: #555;
}
#container {
margin: 70px auto 0 auto;
}
#login {
margin: 50px auto 0 auto;
padding: 30px;
width: 580px;
}
#login h1 {
margin: 0 0 18px 0;
text-align: center;
line-height: 30px;
}
#login .default-text {
margin-bottom: 1.5em;
font-size: 24px;
display: block;
margin-top: 33px;
text-align: center;
}
form{
text-align: center;
}
form#store_password {
border-top: 1px solid #e0e0e0;
padding-top: 25px;
margin-top: 25px;
font-size: 80%;
margin-bottom: 20px;
}
form#store_password label {
padding: 6px 0;
}
#store_password #password {
font-size: 18px;
padding: 4px 6px;
border: 1px solid #ccc;
outline: none;
background: #e9e9e9;
background: -moz-linear-gradient(top, #ececec 0%, #fff 100%);
background: -webkit-gradient(linear, left top, left bottom, color-stop(0%,#ececec), color-stop(100%,#fff));
width: 250px;
}
#store_password label {
display: block;
font-size: 18px;
margin-bottom: 10px;
}
#store_password input {
margin-right: 10px;
}
#footer {
margin-top: 15px;
margin-bottom: 40px;
font-size: 13px;
text-shadow: 0 1px rgba(255,255,255,0.4);
text-align: center;
}
#powered {
color: #9c9c9c;
display: block;
margin-top: 15px;
}
#powered a {
color: #9c9c9c;
text-decoration: none;
}
#powered a:hover {
text-decoration: underline;
}
.errors {
background: #feebeb;
padding: 4px 5px;
font-size: 15px;
color: #7e1412;
display: block;
margin-bottom: 15px;
}
.errors ul {
list-style: none;
padding: 0;
margin: 0;
}
.center {
text-align: center;
display: block;
font-size: 17px;
}
#owner {
font-size: 14px;
text-align: center;
}
</style>
</head>
<body>
<div id='container'>
<div id='login'>
<div>
<h1>{{ store.name }}</h1>
{% if store.password_message and store.password_message != '' %}
<p><span class="default-text">{{ store.password_message }}</span></p>
{% else %}
<p><span class="default-text">Website đang hoàn thiện...</span></p>
{% endif %}
</div>
{% form 'store_password' %}
{{ form.errors | default_errors }}
<label for='password'>Bạn là quản trị website vui lòng nhập mật khẩu để xem giao diện website: </label>
<input type='password' name='password' id='password' autofocus />
<input class="btn" name="commit" type="submit" value="Đăng nhập" />
{% endform %}
<div id='owner'>Bạn có phải chủ cửa hàng? <a href="/admin">Truy cập hệ thống quản trị</a></div>
</div>
<div id='footer'>
<div id='powered'>
Cung cấp bởi <a href="//www.bizweb.vn" target="_blank" title="Tạo website bán hàng với Bizweb" rel="nofollow">Bizweb</a>
</div>
</div>
</div>
<script type="text/javascript">
document.getElementById('password').focus();
</script>
</body>
</html>
b.Chèn ảnh nền riêng:
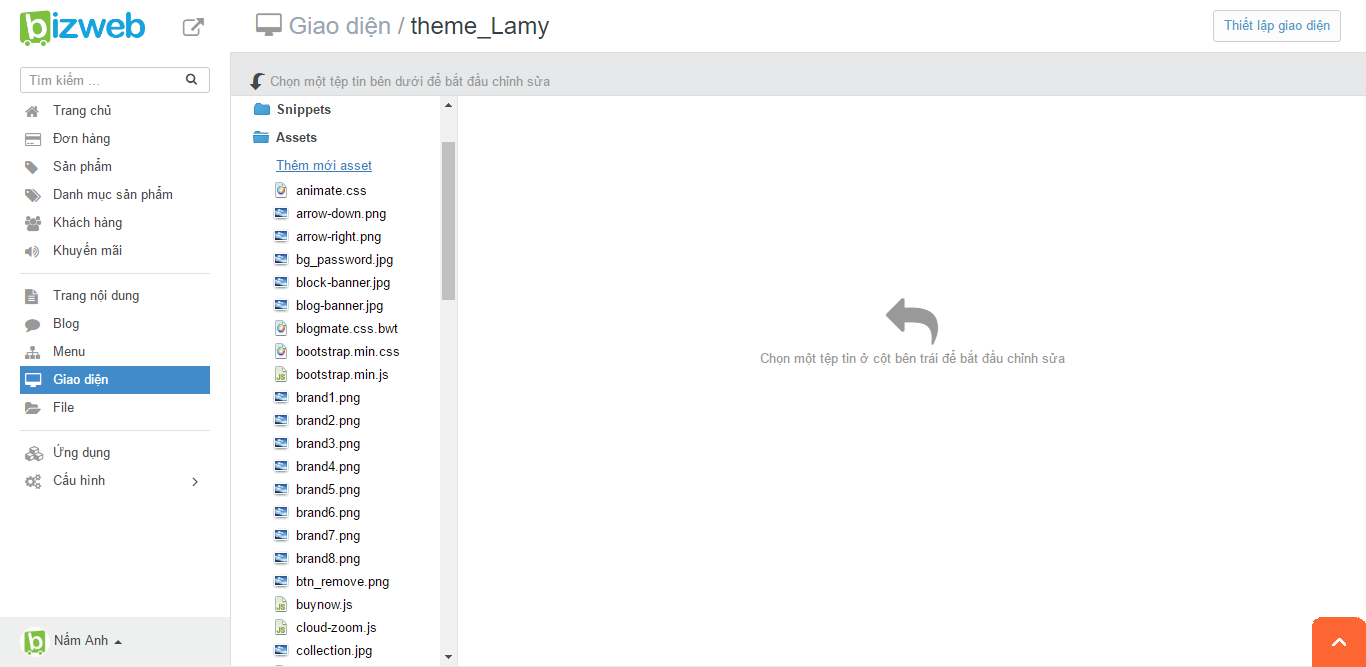
- Để có thể hiển thị hình ảnh nền riêng của bạn, bạn sẽ thực hiện thêm thao tác sau:Trong phần Chỉnh sửa HTML/CSS >> chọn Assets >> click Thêm mới Asset
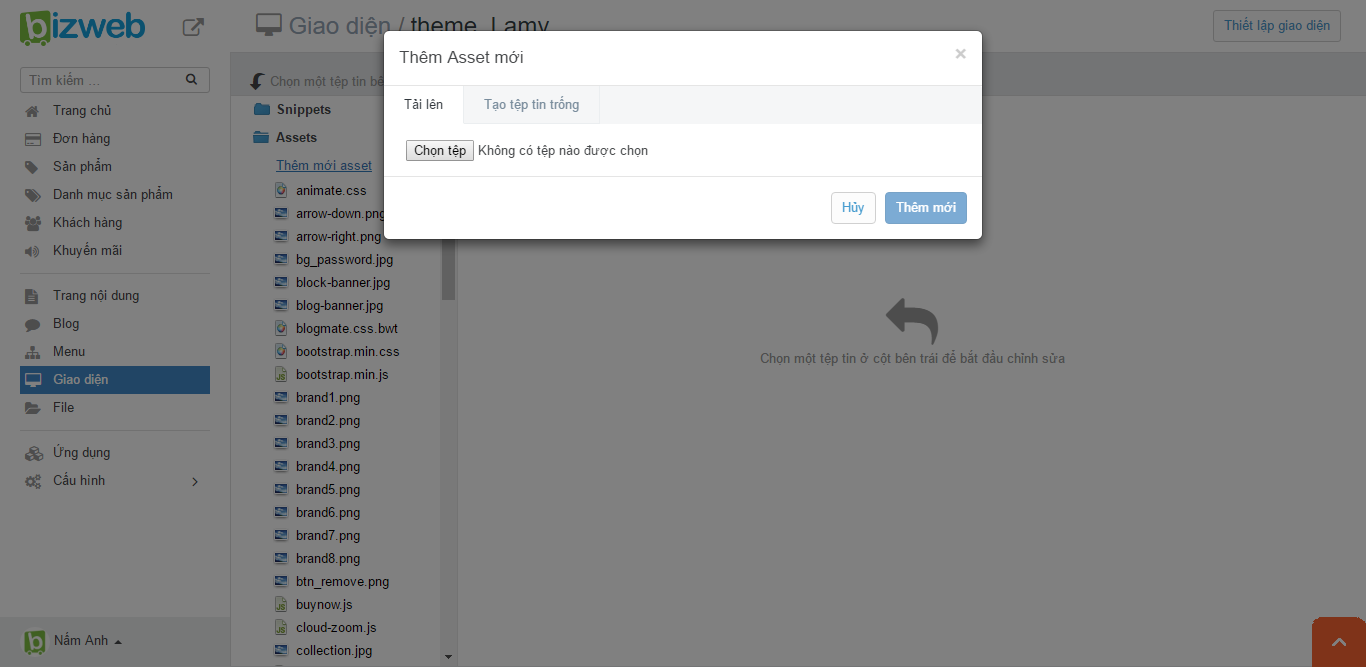
- Popup thêm mới Assets hiện ra bạn chọn tab Tải lên để tải ảnh nền riêng của bạn. Click “Thêm mới” để hoàn thành việc tải ảnh lên.
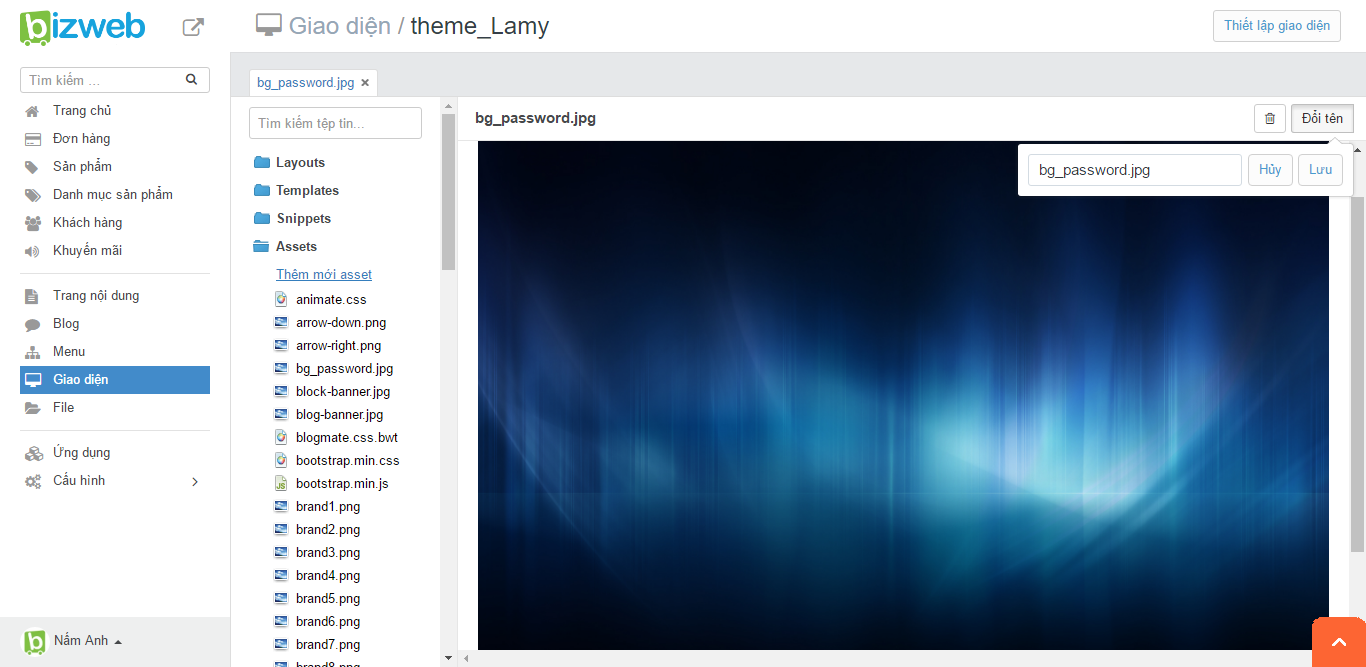
- Đối với hình ảnh tải lên bạn cần đổi lại tên ảnh là “bg_password” để phù hợp với dữ liệu gọi trong đoạn code của trang. Chọn Lưu để hoàn thành việc chỉnh sửa code cho trang password của bạn.
Các bạn có thể xem thêm link site demo nhé: https://bizwebshowtime.bizwebvietnam.net/password
Bài viết trên có hữu ích cho bạn không?
Hữu ích
Không hữu ích

