-
Tài liệu hướng dẫn
-
Kênh POS
Hướng dẫn sử dụng phần mềm quản lý bán hàng
-
Dịch vụ ăn uống
Hướng dẫn sử dụng phần mềm quản lý nhà hàng và quán cafe
-
Kênh Facebook và Sàn TMĐT
Hướng dẫn quản lý bán hàng online trên Facebook và sàn TMĐT
-
App Mobile
Hướng dẫn bán hàng nhanh chóng trên ứng dụng điện thoại
-
Kênh Website
Hướng dẫn xây dựng website bán hàng
-
Bán hàng đa kênh
Hướng dẫn kết nối và quản lý bán hàng đa kênh
-
Máy bán hàng
Hướng dẫn sử dụng máy bán hàng
-
Sapo Money
Giải pháp thanh toán không tiền mặt và các dịch vụ tài chính toàn diện
-
Sapo Express
Giải pháp tối ưu vận hành và chi phí chuyển phát
-
Bảo mật thông tin
-
- Video
- FAQs
- Tài liệu nhà phát triển
Tạo ảnh đại diện, màu sắc cho phiên bản sản phẩm
Tại mỗi sản phẩm trên website đều có tích hợp tính năng tùy chọn cho từng phiên bản sản phẩm, mỗi phiên bản sẽ đi cùng với màu sắc, size, rất nhiều website có nhu cầu để hiển thị ảnh đại diện/màu sắc cho mỗi tùy chọn và muốn thay đổi ảnh sản phẩm khi thay đổi tùy chọn.
Bản chất của các kiểu tùy chọn này là kiểu tùy chọn radio và chọn ảnh thay cho tùy chọn chữ như hiện tại trên các website.
Với bài viết này Bizweb sẽ hướng dẫn các bạn tạo ảnh đại diện/màu sắc cho các tùy chọn sản phẩm nhé, các bạn có thể thực hiện theo hướng dẫn dưới đây:
- Bước 1: Tạo mới một file trong thư mục Snipet tên “swatch.bwt”
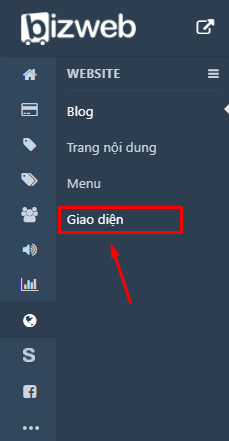
- Vào quản trị website, click Giao diện.
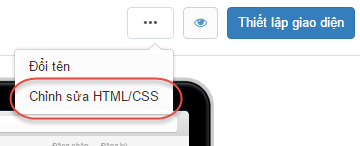
- Trong màn hình giao diện, click vào biểu tượng  sau đó click vào Chỉnh sửa HTML/CSS.
- Trong menu của màn hình Chỉnh sửa HTML/CSS, click vào thư mục Snipet.
- Click vào đường dẫn Thêm mới snipet.

- Điền tên file mới của bạn là “swatch” >> Click vào Thêm mới.

- Sao chép và dán đoạn code sau vào file “swatch.bwt” vừa tạo. Đoạn code sẽ hỗ trợ ảnh “png”, nếu muốn hỗ trợ file khác bạn cần đổi chữ “png” dòng 4 thành các dạng khác. Có 4 dạng tệp được hỗ trợ: png, jpeg, jpg và gif.
{% comment %}
Set the extension of your color files below. Use 'png', 'jpeg', 'jpg' or 'gif'.
{% endcomment %}
{% assign file_extension = 'png' %}
{% if swatch == blank %}
<div class="swatch error">
<p>You must include the snippet swatch.liquid with the name of a product option.</p>
<p>Use: <code>{% raw %}{% include 'swatch' with 'name of your product option here' %}{% endraw %}</code></p>
<p>Example: <code>{% raw %}{% include 'swatch' with 'Color' %}{% endraw %}</code></p>
</div>
{% else %}
{% assign found_option = false %}
{% assign is_color = false %}
{% assign option_index = 0 %}
{% for option in product.options %}
{% if option == swatch %}
{% assign found_option = true %}
{% assign option_index = forloop.index0 %}
<style>
label[for="product-select-option-{{ option_index }}"] { display: none; }
#product-select-option-{{ option_index }} { display: none; }
#product-select-option-{{ option_index }} + .custom-style-select-box { display: none !important; }
</style>
<script>$(window).load(function() { $('.selector-wrapper:eq({{ option_index }})').hide(); });</script>
{% assign downcased_option = swatch | downcase %}
{% if downcased_option contains 'color' or downcased_option contains 'colour' or downcased_option contains 'màu' %}
{% assign is_color = true %}
{% endif %}
{% endif %}
{% endfor %}
{% unless found_option %}
<div class="swatch error">
<p>You included the snippet swatch.liquid with the name of a product option — <code>'{{ swatch }}'</code> — that does not belong to your product.</p>
<p>Use <code>{% raw %}{% include 'swatch' with 'name of your product option here' %}{% endraw %}</code></p>
<p>Example: <code>{% raw %}{% include 'swatch' with 'Color' %}{% endraw %}</code></p>
<p><strong>This is case-sensitive!</strong> Do not put in <code>'color'</code> if your product option name is <code>'Color'</code>.</p>
</div>
{% else %}
<div class="swatch clearfix" data-option-index="{{ option_index }}">
<div class="header">{{ swatch }}</div>
{% assign values = '' %}
{% for variant in product.variants %}
{% assign value = variant.options[option_index] %}
{% unless values contains value %}
{% assign values = values | join: ',' %}
{% assign values = values | append: ',' | append: value %}
{% assign values = values | split: ',' %}
<div data-value="{{ value | escape }}" class="swatch-element {% if is_color %}color {% endif %}{{ value | handle }} {% if variant.available %}available{% else %}soldout{% endif %}">
{% if is_color %}
<div class="tooltip">{{ value }}</div>
{% endif %}
<input id="swatch-{{ option_index }}-{{ value | handle }}" type="radio" name="option-{{ option_index }}" value="{{ value | escape }}"{% if forloop.first %} checked{% endif %} {% unless variant.available %}disabled{% endunless %} />
{% if is_color %}
<label for="swatch-{{ option_index }}-{{ value | handle }}" style="background-color: {{ value | split: ' ' | last | handle }}; background-image: url({{ value | handle | append: '.' | append: file_extension | asset_url }})">
<img class="crossed-out" src="{{ 'soldout.png' | asset_url }}" />
</label>
{% else %}
<label for="swatch-{{ option_index }}-{{ value | handle }}">
{{ value }}
<img class="crossed-out" src="{{ 'soldout.png' | asset_url }}" />
</label>
{% endif %}
</div>
{% endunless %}
{% if variant.available %}
<script>
jQuery('.swatch[data-option-index="{{option_index}}"].{{value|handle }}').removeClass('soldout').addClass('available').find(':radio').removeAttr('disabled');
</script>
{% endif %}
{% endfor %}
</div>
{% endunless %}
{% endif %}
- Sau khi sao chép đoạn mã chọn Lưu để lưu lại thông tin.
- Bước 2: Gọi “swatch.bwt” trong product.bwt
- Trong thư mục Templates của màn hình Chỉnh sửa HTML/CSS, click vào file “product.bwt” để mở trình chỉnh sửa code.
- Sao chép và dán đoạn code dưới đây chèn “swatch.bwt” vào nơi bạn muốn chèn tính năng tùy chọn, bạn có thể chọn vị trí của tính năng này trước đó
{% if product.available and product.variants.size > 1 %}
{% for option in product.options %}
{% include 'swatch' with option %}
{% endfor %}
{% endif %}
- Bạn có thể dán đoạn code dưới dòng </select>

- Bước 3: Chỉnh sửa tính năng selectCallback để giỏ hàng có thể bắt được variant của sản phẩm khi bạn thêm tùy chọn vào giỏ hàng
- Vẫn trong trình chỉnh sửa code file “product.bwt”, tìm đoạn
selectCallback
- Trong trường hợp không tìm thấy, bạn có thể tìm trong file “theme.bwt” trong thư mục Layouts.
- Tiến hành sao chép đoạn code dưới đây:
if (variant) {
var form = jQuery('#' + selector.domIdPrefix).closest('form');
for (var i=0,length=variant.options.length; i<length; i++) {
var radioButton = form.find('.swatch[data-option-index="' + i + '"] :radio[value="' + variant.options[i] +'"]');
if (radioButton.size()) {
radioButton.get(0).checked = true;
}
}
}
Vào vị trí

- Bước 4: Sao chép đoạn code dưới đây và dán vào vị trí cuối cùng của file “product.bwt”
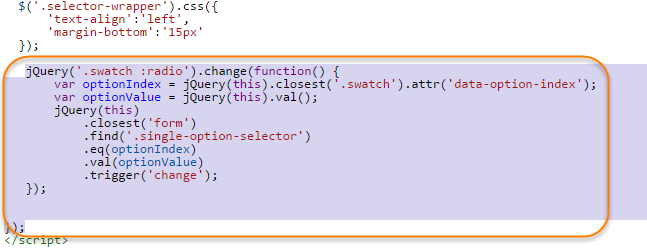
jQuery('.swatch :radio').change(function() {
var optionIndex = jQuery(this).closest('.swatch').attr('data-option-index');
var optionValue = jQuery(this).val();
jQuery(this)
.closest('form')
.find('.single-option-selector')
.eq(optionIndex)
.val(optionValue)
.trigger('change');
});
});
- Sao chép đoạn code trên và dán vào trước dòng </script> cuối cùng của file product.bwt
- Bước 5: Tải file soldout.png vào thư mục Assets.

- Lưu file này về máy tính của bạn.
- Trong thư mục Assets, click vào Thêm mới asset.
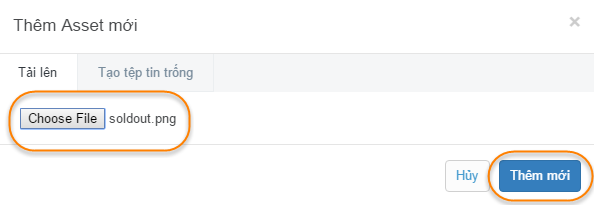
- Tải lên file soldout.png và click Thêm mới.
- Bước 6: Thêm chỉnh sửa style bằng css cho tính năng tùy chọn
- Trong thư mục Assets, click vào Thêm mới asset
- Chọn Tạo tệp tin trống, nhập tên “swatch-style” và chọn kiểu “.css.bwt”. Sau đó click Thêm mới
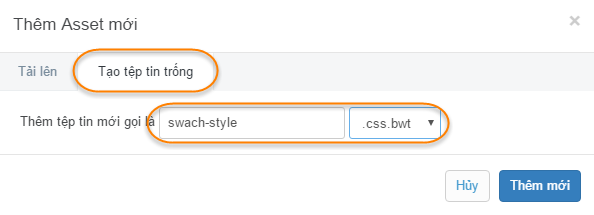
- Thêm đoạn code dưới đây vào file “swatch-style.css.bwt” vừa tạo
/*
Swatches Styles
*/
{% assign width = '50px' %}
{% assign height = '35px' %}
.swatch {
margin:1em 0;
}
/* Label */
.swatch .header {
margin: 0.5em 0;
text-align: left;
}
/* Hide radio buttons.*/
.swatch input {
display:none;
}
.swatch label {
/* Rounded corners */
-webkit-border-radius:2px;
-moz-border-radius:2px;
border-radius:2px;
/* To give width and height */
float:left;
/* Color swatches contain no text so they need to have a width. */
min-width:{{ width }} !important;
height:{{ height }} !important;
/* No extra spacing between them */
margin:0;
/* The border when the button is not selected */
border:#ccc 1px solid;
/* Background color */
background-color:#ddd;
/* Styling text */
font-size:13px;
text-align:center;
line-height:{{ height }};
white-space:nowrap;
text-transform:uppercase;
}
.swatch-element label { padding:0 10px; }
.color.swatch-element label { padding:0; }
/* Styling selected swatch */
/* Slightly raised */
.swatch input:checked + label {
-webkit-box-shadow:0px 1px 2px rgba(0,0,0,0.8);
-moz-box-shadow:0px 1px 2px rgba(0,0,0,0.8);
box-shadow:0px 1px 2px rgba(0,0,0,0.8);
border-color:transparent;
}
.swatch .swatch-element {
float:left;
-webkit-transform:translateZ(0); /* webkit flicker fix */
-webkit-font-smoothing:antialiased; /* webkit text rendering fix */
/* Spacing between buttons */
margin:0px 10px 10px 0;
/* To position the sold out graphic and tooltip */
position:relative;
}
/* Image with the cross in it */
.crossed-out { position:absolute; width:100%; height:100%; left:0; top:0; }
.swatch .swatch-element .crossed-out { display:none; }
.swatch .swatch-element.soldout .crossed-out { display:block; }
.swatch .swatch-element.soldout label {
filter: alpha(opacity=60); /* internet explorer */
-khtml-opacity: 0.6; /* khtml, old safari */
-moz-opacity: 0.6; /* mozilla, netscape */
opacity: 0.6; /* fx, safari, opera */
}
/* Tooltips */
.swatch .tooltip {
text-align:center;
background:gray;
color:#fff;
bottom:100%;
padding: 10px;
display:block;
position:absolute;
width:100px;
left:{{ width | remove: 'px' | to_number | divided_by: 2 | minus: 50 | plus: 2 }}px;
margin-bottom:15px;
/* Make it invisible by default */
filter:alpha(opacity=0);
-khtml-opacity: 0;
-moz-opacity: 0;
opacity:0;
visibility:hidden;
/* Animations */
-webkit-transform: translateY(10px);
-moz-transform: translateY(10px);
-ms-transform: translateY(10px);
-o-transform: translateY(10px);
transform: translateY(10px);
-webkit-transition: all .25s ease-out;
-moz-transition: all .25s ease-out;
-ms-transition: all .25s ease-out;
-o-transition: all .25s ease-out;
transition: all .25s ease-out;
-webkit-box-shadow: 2px 2px 6px rgba(0, 0, 0, 0.28);
-moz-box-shadow: 2px 2px 6px rgba(0, 0, 0, 0.28);
-ms-box-shadow: 2px 2px 6px rgba(0, 0, 0, 0.28);
-o-box-shadow: 2px 2px 6px rgba(0, 0, 0, 0.28);
box-shadow: 2px 2px 6px rgba(0, 0, 0, 0.28);
z-index: 10000;
-moz-box-sizing:border-box;
-webkit-box-sizing:border-box;
box-sizing:border-box;
}
.swatch .tooltip:before {
bottom:-20px;
content:" ";
display:block;
height:20px;
left:0;
position:absolute;
width:100%;
}
/* CSS triangle */
.swatch .tooltip:after {
border-left:solid transparent 10px;
border-right:solid transparent 10px;
border-top:solid gray 10px;
bottom:-10px;
content:" ";
height:0;
left:50%;
margin-left:-13px;
position:absolute;
width:0;
}
.swatch .swatch-element:hover .tooltip {
filter:alpha(opacity=100);
-khtml-opacity:1;
-moz-opacity:1;
opacity:1;
visibility:visible;
-webkit-transform:translateY(0px);
-moz-transform:translateY(0px);
-ms-transform:translateY(0px);
-o-transform:translateY(0px);
transform:translateY(0px);
}
.swatch.error {
background-color:#E8D2D2!important;
color:#333!important;
padding:1em;
border-radius:5px;
}
.swatch.error p {
margin:0.7em 0;
}
.swatch.error p:first-child {
margin-top:0;
}
.swatch.error p:last-child {
margin-bottom:0;
}
.swatch.error code {
font-family:monospace;
}
- Chọn Lưu để lưu thông tin.
- Bước 7: Tải lên tệp ảnh tượng trưng cho các giá trị tùy chọn
- Trong thư mục Assets, click vào Thêm mới asset.
- Tải lên tệp ảnh tượng trung cho tùy chọn bạn muốn và click Thêm mới.
Lưu ý
Lưu ý: Tệp mà bạn muốn tải lên phải có tên theo kiểu Tiếng Viêt không dấu, không viết hoa. Dạng tệp phải đúng với code mà bạn đặt ở bước tạo “swatch.bwt”.
- Ví dụ: Giá trị tùy chọn của bạn là Trắng: thì tệp ảnh của bản phải có tên “trang.png”.
- Hoặc giá trị tùy chọn của bạn là Trắng đục thì tệp của bản tải lên có tên “trang-duc.png”.
- Ngoài ra, nếu bạn sử dụng màu sắc theo tên tiếng anh chuẩn CSS, website sẽ tự động hiển thị mã màu đó mà bạn không cần thêm ảnh vào thư mục Assets. Màu sắc theo tên Tiếng Anh: https://en.wikipedia.org/wiki/Web_colors
- Sau khi thực hiện hết các thao tác, bạn cần sao chép đoạn code
{{ 'swatch-style.css' | asset_url | stylesheet_tag }}
- Và dán vào phần head của “theme.bwt” trong thư mục
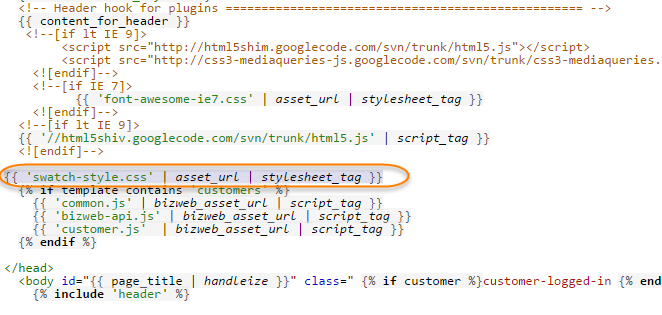
- Bước 8: Cuối cùng, để ảnh có thể thay đổi theo tùy chọn, bạn cần chọn ảnh cho tùy chọn của bạn trong quản trị Bizweb.
- Vào quản trị >> Sản phẩm >> Click vào 1 sản phẩm cần thay đổi tùy chọn
- Tại phần Quản lý kho và tùy chọn >> Click vào phiên bản cần sửa >> Chọn Sửa
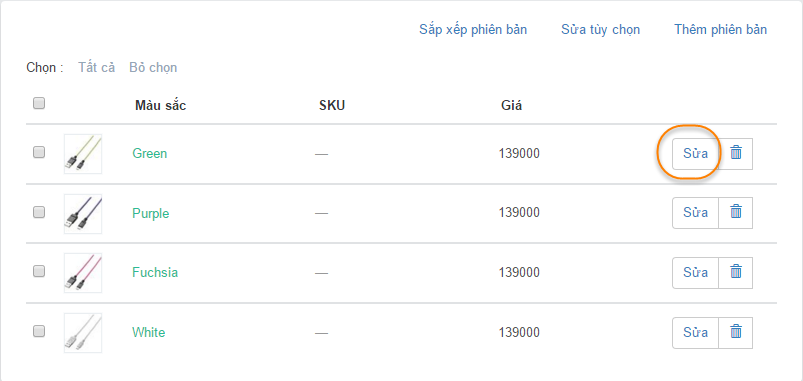
- Trong trình chỉnh sửa tùy chọn, click Chọn ảnh để đưa hình ảnh tương ứng với phiên bản lên.

- Sau khi chọn ảnh xong, chọn Lưu để hoàn thành, tương tự với các phiên bản khác cũng thực hiện như vậy.
- Chọn ảnh cho tùy chọn của bạn và click Cập nhật
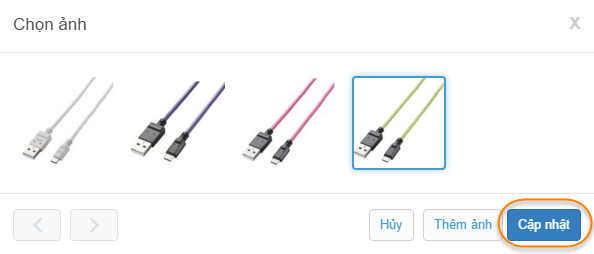
Bài viết trên có hữu ích cho bạn không?
Hữu ích
Không hữu ích

